November 5, 2018
Guide: Using Symbolic Links with Sononym
Updated 2018-11-23
This article is going to demonstrate how symbolic links (symlinks) can make a difference in Sononym.
If you are an advanced user, you probably already have come across the term ‘symlink’, or ‘symlinking’. If not, don’t worry, we will briefly explain the concept. But first, here’s a quick mention of some scenarios where symlinks can make a positive difference in Sononym:
Potential benefits of using symlinks
- Speeding up access to (very) large sample collections, or files located on a network (NAS).
- Ability to merge sample folders which are scattered across your computer.
- Ability to index folders which are otherwise marked as read-only.
- Sharing a pool of samples with other people while working in a team setting.
- Hiding
sononym.dbfiles (to keep those sample folders nice and tidy).
How it works
The technique is based on a very simple idea: to bring Sononym databases close to the application / onto a faster media. This is achieved by moving libraries onto that media, and then using symlinks to “trick” the application into thinking that the files are also located there. Under some circumstances, this approach can speed up the initial access time dramatically.
All you need is a hard drive or SDD with a few gigabytes of available space (for storing databases), and the skills to create symbolic links.
⚠️ IMPORTANT: As with any operation performed on your file system, it’s absolutely essential that you understand what you’re doing. We will not take responsibility for any potential data loss that is caused, directly or indirectly, by the instructions provided in this article.
So, what are symlinks?
Symlinks are a feature of your operating system that allows you to place “references” to files or folders situated in a different location on your computer. So you could create a file on your desktop that references a file somewhere else on your harddrive, and as a result, access the same file from two different places.
In practice, your operating system simply understands a symlink as a reference to a file. So the link itself don’t take up more than a few bytes of hard disk space. And, unlike similar OS-specific features such as the MacOS ‘alias’ or the Windows ‘shortcut’, symlinks are almost universally understood by software - Sononym included.
How do I benefit?

-
Are you accessing your samples from a mechanical harddisk, but have an SSD drive with a few gigabytes of free space? Offloading the database to SSD can speed up initial access dramatically, by a factor of up to 10-50x.
-
Are you accessing samples from a network drive (NAS, or otherwise)? Offload the database to a local disk to speed up access - or use SSD for even faster access.
-
Do you want to index files that are stored in a read-only location, or irked by the presence of
sononym.dbfiles in your sample collection? Offloading the database means that these files are created elsewhere. -
Do you want to access a shared pool of samples with other people? Offloading the database means you can avoid “locking” issues, since each team member works on their own database.
Other than this, there is no real advantage of using symlinks - if the media you are offloading the database to isn’t faster than the existing drive, symlinks won’t be faster as a result.
Scenario #1: Symlinking an existing library
Use this approach if you have a collection of files that have already been indexed, and you simply want Sononym to use the existing sononym.db
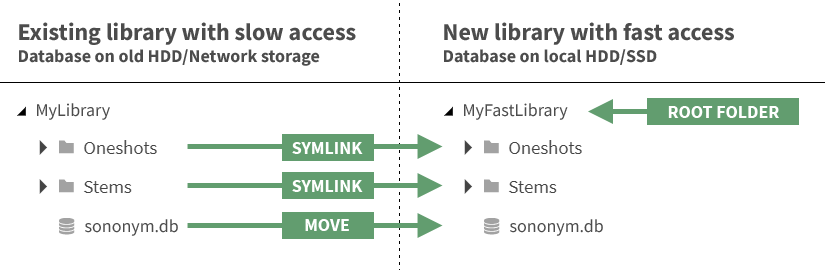
- Pick your fast drive (SSD or HDD with enough space for the database)
- Create a folder somewhere on this drive
- Copy the
sononym.dbfrom your existing library into the root of the newly created folder - Create symlinks for each of the subfolders within the source library
- In Sononym, choose ‘Create Library’ from the File menu and choose the newly created folder
- Voila - the library should be mounted and your files are ready to browse
Note: in the example, only changes within symlinked folder (‘Oneshots’ and ‘Stems’) are picked up when you choose to manually refresh the database (Right-click > Refresh). Choose the next approach (Scenario #2) if you want to track changes to ‘MyLibrary’ as well.
Scenario #2: Merging multiple folders into a single library
Use this approach if you have folders containing samples which are scattered across various places on your computer, and you wish to access them as a single library. Note that this approach will require you to re-index all files.
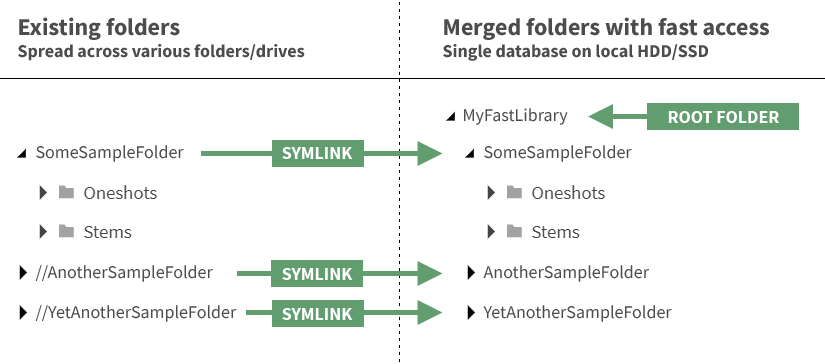
- Pick your fast drive (SSD or HDD with enough space for the database)
- Create a folder somewhere on this drive
- Create symlinks for each of the folders your want to appear in your new library
- In Sononym, choose ‘Create Library’ from the File menu and choose the newly created folder
- Sononym will start indexing the files - your files can browsed while this takes place.
How to create a symlink
On MacOS
In MacOS, symlinks can be created through the terminal. To open a Terminal, navigate to Applications > Utilities > Terminal.
Once you have an open terminal window, you can use the ln command. The syntax is as follows:
ln -s /path/to/target /path/to/source
The
-sargument tells thelncommand to create a symbolic link. This is required, as the command will otherwise create a ‘hard link’ (a type of link which does not work across drives)
Here’s a more concrete example - symlinking a sample folder into our new SSD-based library (Scenario #2):
ln -s /path/to/AnotherSampleFolder /Volumes/MySSD/MySymlinkedLibrary
As a result, a folder named
AnotherSampleFolderwill be created inside theMySymlinkedLibraryfolder. So you don’t need to specify the target folder name, the command only needs this information for the source.
Additional notes
- If your file path contains spaces or other special characters, you’ll need to enclose it in quotation marks.
- To automatically fill in the path, you can drag-and-drop a folder from the Finder window into the Terminal.
- See also this complete guide to using symlinks on MacOS: https://www.howtogeek.com/297721/how-to-create-and-use-symbolic-links-aka-symlinks-on-a-mac/
On Windows 7,8 and 10
You can create symbolic links using the Command Prompt window while running as Administrator. To open one, locate the “Command Prompt” shortcut in your Start menu, right-click it, and select “Run as Administrator”.
Once you have an open command prompt window, use the mklink command to create the symlink. The syntax is as follows:
mklink Link Target
In our case, we want to create symlinks of folders. In order to do that, we add the /D arguments:
mklink /D Link Target
Here’s a more concrete example - symlinking a sample folder into our new SSD-based library (Scenario #2):
mklink /D "F:\My Symlinked Samples" "C:\My Sample Collection"
As a result, a folder named
My Sample Collectionwill be created inside theMy Symlinked Libraryfolder. So you don’t need to specify the target folder name, the command only needs this information for the source.
Additional notes
- Make sure that the target (the link we create) is not already present. You will receive an error message if it does.
- If your file path contains spaces or other special characters, you’ll need to enclose it in quotation marks.
- If you often work with symlinks, or need to create a large amount of them, the following software might be of interest - it integrates into the explorer as a shell integration, and makes it possible to right-click-and-drag to create symlinks: http://schinagl.priv.at/nt/hardlinkshellext/hardlinkshellext.html
- See also this complete guide to using symlinks on Windows: https://www.howtogeek.com/howto/16226/complete-guide-to-symbolic-links-symlinks-on-windows-or-linux/
On Linux
In Linux, symlinks can be created through the terminal, using the ln command. The syntax is as follows:
ln -s /path/to/target /path/to/source
The
-sargument tells thelncommand to create a symbolic link. This is required, as the link command will otherwise create a ‘hard link’ (a type of link which does not work across drives)
Here’s a more concrete example - symlinking a sample folder into our new SSD-based library (Scenario #2):
ln -s /path/to/AnotherSampleFolder /dev/sda3/MySymlinkedLibrary
As a result, a folder named
AnotherSampleFolderwill be created inside theMySymlinkedLibraryfolder. So you don’t need to specify the target folder name, the command only needs this information for the source.
Additional notes
- If your file path contains spaces or other special characters, you’ll need to enclose it in quotation marks.
- See also this complete guide to using symlinks on Linux: https://www.howtogeek.com/287014/how-to-create-and-use-symbolic-links-aka-symlinks-on-linux/
Conclusion
Symlinks are such a powerful feature, and good to know about when working with large sample collections. But they are also potentially confusing to use, which is why we have so far provided these tips on a personal basis, through our support channel.
One day we might be brave enough to build this kind of functionality right into Sononym - but until then, this article is meant to act as reference on this subject.
Questions or comments: don’t hesitate to contact us

