Duplicate Detection
Duplicate-detection can be used for hiding duplicate content in your libraries, and to free up disk space on your computer. If you like the idea of having smaller and more focused sample libraries, continue reading…
How it works
Unlike a traditional “duplicate file checker”, Sononym is capable of identifying sounds that are identical, but also sounds that are nearly identical. So you happen to have a lot of sounds encoded in different formats (say, .aif and .wav), you can use this feature to identify those files, and take some kind of action on them.
Our approach - using the “audio descriptors” that Sononym collected while creating your libraries - means that searching for duplicates of any given file is nearly instantaneous. But it should also be noted that the tradeoff is that such quick matching isn’t always perfect - occasionally, the search might deliver a result that isn’t a duplicate. See Known Limitations below for more information.
Step 1: Launching The Duplicate Checker
The detection process is easy to launch:
- Right-click a sound to find duplicates of that specific sound in other locations.
- Right-click a folder (or library) to find duplicates within that location.
Once you select launch a search, the following dialog appears:
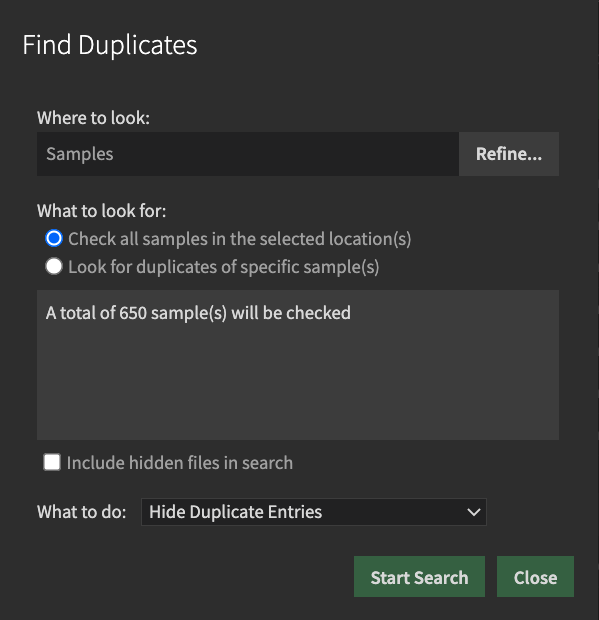
The dialog is divided into three logical sections:
Where to look: this section determines the source location for the search. The location can be a single folder, an entire library or even multiple libraries. To change the current location, click ‘Refine’.
What to look for: if you have launched the search on a folder or library, the default choice is to detect duplicates within that location. If you launched the search to look for one or more specific sample(s), their paths are listed here.
‘Include hidden files’: instructs Sononym to include previously hidden files in the search.
What to do: here you can determine the default action to take for duplicate items. The available options are:
- Hide Duplicate Entries
- Link Duplicate Entries To Source
- Delete Duplicate Entries (Move To Trash)
Once you are happy with the settings, you can click ‘Start Search’. Immediately, a dialog should appear which displays the search progress.
Step 2: Search Results & Actions
Search results are shown in a list which is continuously updated while the search is running.
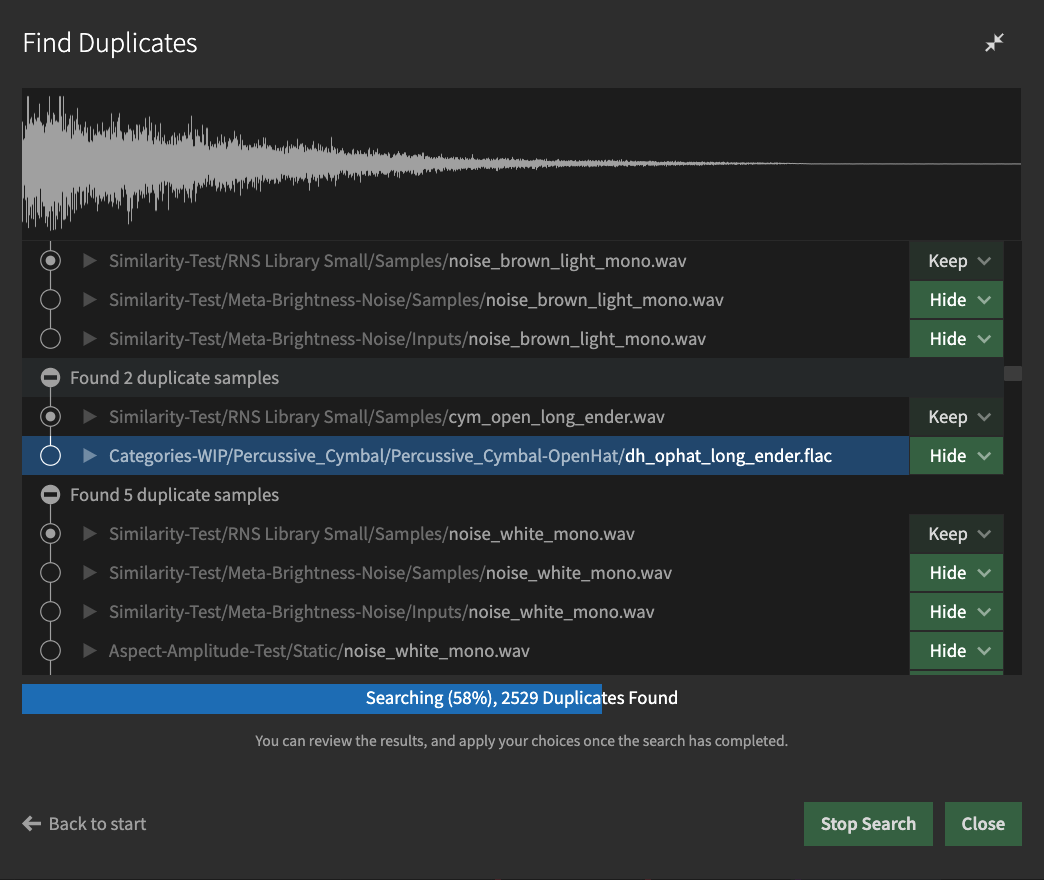
By default, the dialog has a relatively compact size, but you can click the icon in the upper-left corner to maximize it. Apart from offering more horizontal space for file paths, maximizing the dialog will also reveal a waveform display at the top.
In the middle of the dialog the search results are located. The results are organized into “sets”, comprised of sounds that are considered duplicates. Each of the sets can be collapsed and expanded by clicking the icons on the left-hand side, or by using the keyboard shortcuts.
Note that you can always close this dialog and let the search continue in the background. This might be useful if the search takes a while to complete.
Got Duplicates? Now Do Something With Them!
Once results start to appear, you can specify what action to take. By default, the action will be the one you picked before starting the search (Hide/Link/Delete), but you can change these actions at any time by clicking the action button.
If you do, a menu will appear containg these options:
- Keep: Simply means “keep this file around, and don’t take any action”. Usually, this is the action assigned to the topmost item in a set.
- Hide/Unhide: Will decide the hidden state of the sample within the Sononym library without modifying the physical file.
- Link/Unlink: Will replace the source file with a symbolic link, or vice versa (more info below).
- Delete: Move the specific file to the trash.
- Use As Link Target: Manually specify which file should be used as the source when creating links.
Note that some of the options might not be available at all times. For example, only a file which was previously hidden can be unhidden.
Regarding Symbolic Links: By replacing files with symbolic links, you can potentially save disk space without deleting any files. Still, it’s worth pointing out that this is a relatively advanced feature - not all filesystems support symbolic links, and on Windows, you might need to take the additional step of launching the application in “Administrator Mode”.
Additional Actions
In addition to the standard actions, the actions menu contains a couple of more specialized actions:
- “Prefer to keep files matching this file extension”
- “Prefer to keep files from this folder”
These actions cater to a couple of special scenarios. Imagine that you’d want to prioritize a specific file extension over another one? Or that your library contains a copy of another folder, and you want only one of these folders to remain visible? In both cases, clicking the action will show an additional dialog with more information.
For example, here’s what we might see if we decided to “prefer” a different folder:
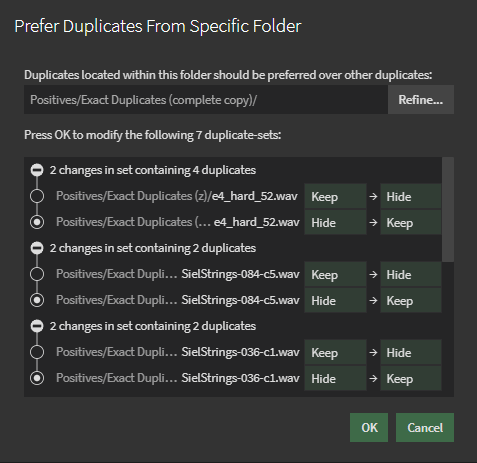
As you can see, the dialog allows you to specify a different folder. This can be important when the file itself was located deep in a folder hierarchy, and you want to pick one of its parent folders. If you do, the preview will immediately be rebuilt to reflect the changed folder.
Worth knowing:
- When you choose to prefer a folder or extension, this choice will be applied as results arrive (while the duplicate detector is running). Only once you start a new search, your choice of preferred folders or extensions will be reset.
- Multiple preferred folders or extensions can be defined simultaneously, and will be applied in the order you defined them.
Step 3: Applying Actions to Results
Once the search is complete, a panel will appear below the search results containing one or more buttons. These buttons will allow you to actually apply the actions you have specified. Trying to close the dialog at this point will remind you of that no actions were applied.
Additionally, you might notice that each button has a small arrow on the left side - clicking this will allow you to remap the action into a different type of action (changing all occurrences in the results).
Finally, in case the duplicate checker detected any issues/inconsistencies in the results, the panel will feature an additional button which, when clicked, will show a list of all the issues and suggest possible workarounds.
Known Limitations
Embedded metadata is ignored
Metadata, such as “Artist”, “Year”, “Genre”, etc. is currently NOT considered when comparing the files. So, if you have a number of identical files, but each one tagged with varying information, this is simply ignored.
False positives
Every now and then, it’s possible that the duplicate checker deliver results that aren’t really identical. More specifically, we found that sounds with swapped channel content and multichannel-to-mono mixdowns can “slip through” the detection algorithm. We are working to improve this aspect of the duplicate detector.
Related pages
- Does Sononym support embedded metadata?
- Can Sononym show audio properties such as number of channels and bit-rate?