Projects
The Project makes it easy to bookmark, organize and export sounds of interest.
NB: Up until Sononym 1.3, Projects were referred to as ‘Collections’. Some of the screenshots on this page are not updated to reflect this change.
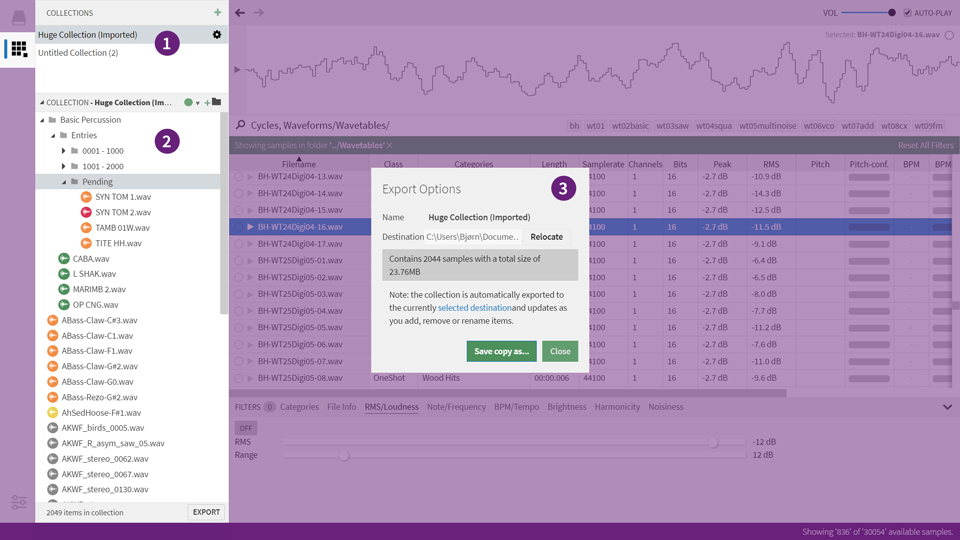
List of Projects (1), Tree widget (2) and Export dialog (3)
A Project is a place to store references to sounds. You can create as many projects as you like, freely organize sounds within each project and export them to a folder of your choice.
Projects also makes it easy to enforce a naming convention to items within the Project. For instance, you might want to tag all files with their BPM or Pitch information. The section on renaming explains how this can be achieved.
Adding Items
The easiest way to add an item to a project is to press the keyboard shortcut while browsing through some results. This will add the selected result(s), using the currently selected path in the currently selected project as the insertion point.
Alternatively, you can drag and drop the items manually:
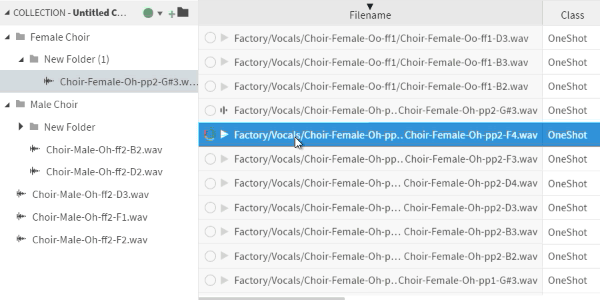
Using drag and drop to add items to a project
List of projects
- To select a project, click in the list (1)
- To re-arrange the list, use drag and drop.
- To view options for the project, press the “gear” symbol or right-click.
Creating a Project
By default, the application will start with an empty, default project, but you can always add a new one by pressing the relevant keyboard shortcut or hitting the green “+” at the top of the projects panel.
Organizing content
Once a project grows beyond a few items, it can become necessary to organize things a little more. Using the tree widget in lower part of the sidepanel, this is all accomplished quite easily:
- Create folders, delete, rename and assign colors to items
- Multi-select (hold shift key while selecting, etc.)
- Re-arrange items via drag and drop, or by using the clipboard (copy/paste).
Renaming items
When you add an item to a Project, you are able to provide an alternative name for it without modifying the original/source file.
If you click the checkbox Advanced Renaming, the rename dialog will expand and allow you to embed all sorts of information into the names of your files. Advanced renaming is a big subject with its own dedicated page.
Assigning Colors
Any item can be assigned to one of the seven available colors, but it’s up to you to decide the meaning. For now, the colors exist merely as a way to visually distinguish between files.
Options Dialog
To bring up the Options dialog, press the “gear” symbol or right-click (1), or press the “Options” button in the lower-right corner of the Tree (2).
Auto-Export
Enable auto-export to automatically export the Project to a folder of your choice, every time the contents have changed.
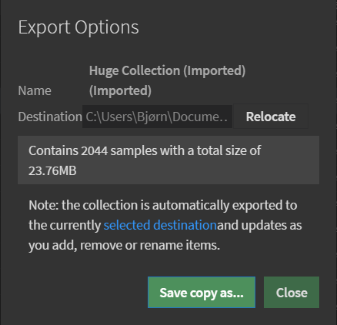
When you enable Auto-Export, the contents of the project will be exported to a folder of your choice. This folder, by default, is located in User Documents > Sononym.
If you want to use a different folder, click “Relocate” on the right side of the Target Folder. This will launch a file dialog asking you to pick a different folder - and asking you to confirm the action. Once you click OK, the project is moved to the new location. In other words, it’s not necessary to move the collection folder using Finder/Explorer/Etc.
Exporting
A project is either exported automatically or manually -
- Automatic Export: please see Auto-Export above.
- Manual Export: either bring up the Options Dialog and hit ‘Export’, choose File Menu > Export Project or press Cmd/Ctrl+E
Importing
A project can be imported by choosing “Import Project” from the File menu. This will open a file dialog, expecting you to select a file named project.json*. The imported project will appear in the list of projects, and should be ready to use.
*Historically, these files were named
collection.json. Both file names will continue to be valid.