Filtering
Narrow down the number of results by applying filters to the search
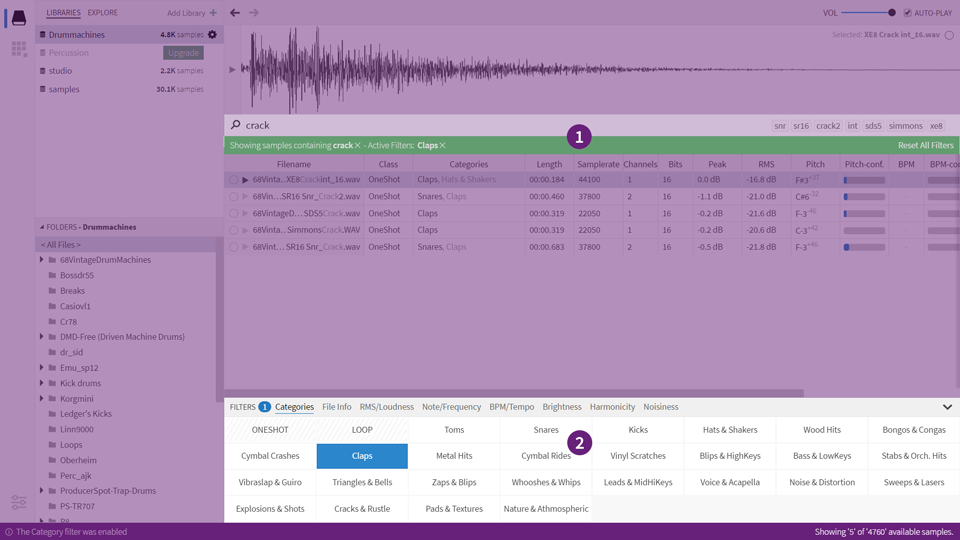
The filter-banner (1) and filter-panel (2)
Imagine that you start Sononym and select the root path of one of your sample libraries - without filtering, the software will simply show all files contained in the library. If you then select a subfolder, you will see all files contained within that folder, and so on. What you are doing is essentially filtering: the process of eliminating results by specifying some kind of criteria.
Navigating through folders is intuitively controlled by using the Location file tree and via the Search Input. But there are several other filters that can make your results more specific and relevant - all contained within the Filter Panel.
Filter Banner
The Filter Banner is the narrow strip between the search input and the results table, which contains all active/applied filters.
To the left, you can click the text of each individual filter to highlight/focus the relevant part of the interface, or click the small “X” to remove that particular filter.
To the right, a button (Reset All Filters) allows you to remove all active filters in one go.
Clicking the filters will highlight relevant parts of the interface
Filter Panel
The filters are located in the panel just below the search results. The panel can minimized, enlarged and freely resized. Clicking any tab will take you to the relevant sub-panel. Double-clicking the name will toggle the visible state of the panel.
General
This panel contains filters that deal with user-specified properties.
- Favorites: this filter will allow you to (A) exclude or (B) include (only) favorited items in the search results.
- Hidden files: this filter will allow you to (A) show only hidden files or (B) include them in the search results (temporarily “unhide” them).
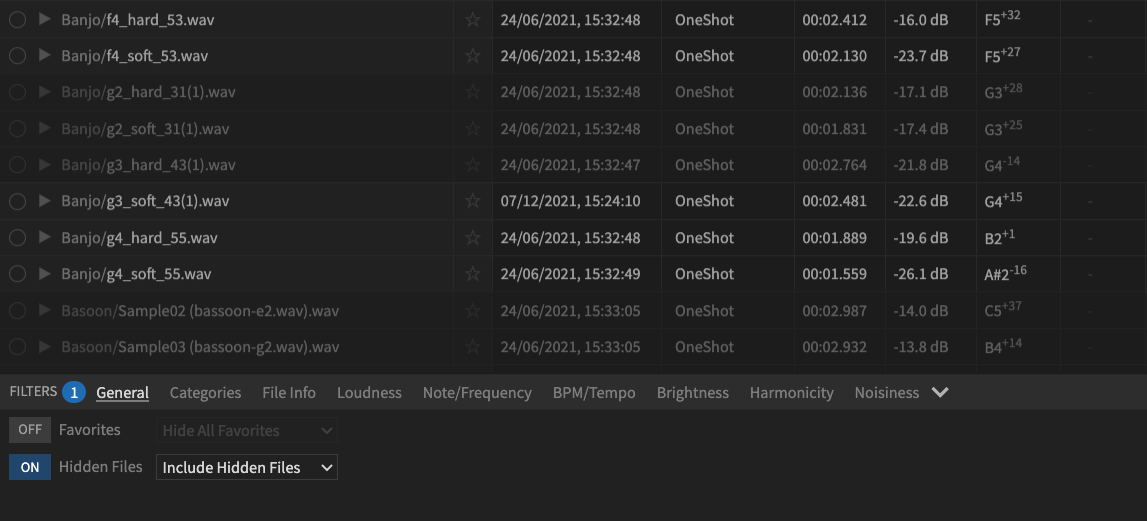
Here, the Hidden Files filter has been configured to show hidden files. But the default (disabled) setting for this filter will actually hide the files completely.
Note that changing the hidden state of a file in Sononym won’t affect its hidden or visible state in your file-system. It’s purely a feature that applies to search results within our sample browser.
Categories
The category-filter allows you to filter search results by category and class.
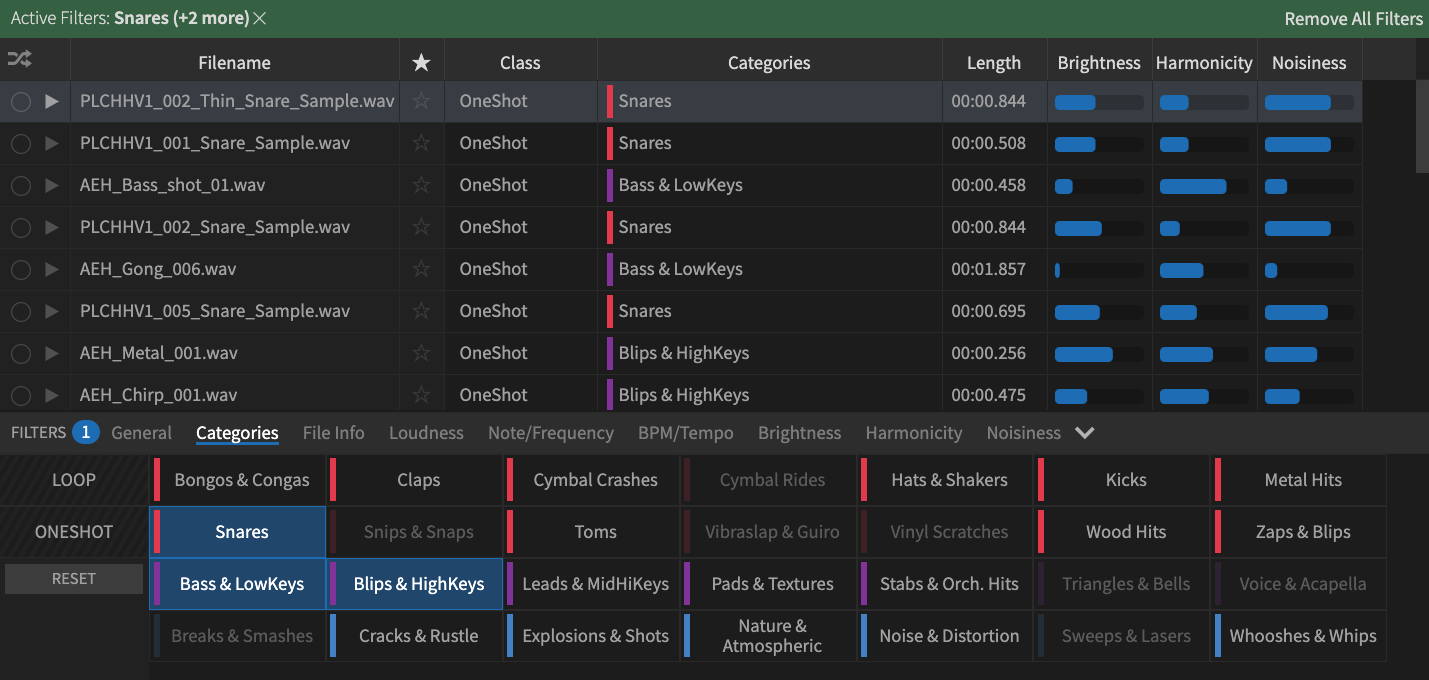
Selecting any of the categories will sort the results by relevance - meaning that the topmost results will now be the ones that Sononym thinks are the best match for the selected category(-ies): the most “kick-alike”, “snare-alike”, and so on. If you then sort the search results by some other criteria (for example, by Brightness), you can reinstate the “sort by relevance” by clicking the sort button (3:TODO). Note that this button is only visible while this filter is active but results are sorted by some other criteria.
When a given category appears “dimmed”, Sononym didn’t find any sounds in the library featuring that category as the primary prediction.
Tip: if you’d always like to select a single category at a time (the “old” approach), you can right-click the categories.
Oh, and let’s not forget about the two buttons on the right-hand side: ONESHOT and LOOP. They filter by class instead of category, but otherwise the functionality is largely identical; selecting ONESHOT will display the most oneshot-alike sounds from all categories, while LOOP will provide you with the sounds best matching a loop.
See also Classes & Categories for more information
File info
This panel collects multiple filters that deal with file properties: the length of the audio, the samplerate, number of channels and bits. Each filter can be controlled individually of one another.
See also file-info descriptors
Loudness
This panel consists of three individual filters that all deal with loudness in some way: Peak, RMS/dB and Crest Factor.
You can type values while the slider is focused. More info
Note/Frequency
This panel allows you to define a range for the Note/Frequency. It has three modes:
- Note: allow you to enter a specific pitch class (e.g. “F”), regardless of the octave.
- Note-range: allows to you define the range as (MIDI-compatible) note values.
- Hz-range: allows you to specify the range using Hz
You can type values while the slider is focused. More info
BPM/Tempo
This panel allows you to define a range between 50 and 250 BPM. Use it to isolate sounds with a specific tempo.
You can type values while the slider is focused. More info
See also BPM/Tempo descriptor
Brightness
This panel allows you to restrict the results to those that match a specific Brightness, between 0% (very dark) and 100% (very bright).
You can type values while the slider is focused. More info
See also Brightness descriptor
Harmonicity
This panel allows you to restrict the results to those that match a specific Harmonicity, between 0% (dissonant) and 100% (harmoneous).
You can type values while the slider is focused. More info
See also Harmonicity descriptor
Noisiness
This panel allows you to restrict the results to those that match a specific Noisiness, between 0% (clean sounding) and 100% (noisy).
You can type values while the slider is focused. More info
See also Noisiness descriptor
Controlling sliders
Several of the filter panels are using a range slider to control the filter. This type of slider can be controlled the keyboard, which sometimes offer more accuracy and faster input than when using the mouse. For example, you can enter values directly by typing while the slider is focused. If the value is recognized, the slider will immediately be updated.
Try it yourself: head into one of the filter panels, e.g. “BPM”. Make sure the filter is enabled (that the ON button in the top-left corner is enabled). Then, click one of the slider “arrows” to bring focus to the slider. Now, you can enter numeric values to control the value of the slider. Next, try pressing TAB (or Shift+TAB) to move focus through the various slider controls, and notice how you can set both the minimum and maximum value at the same time.