Tagging
Introduction
Tags can help to organize your content. They are small text labels that you can freely associate with your files to describe something: perhaps the music genre, the mood of a given sound - anything, really.
When you use Sononym, you will find that it comes with thousands of pre-defined tags. These tags are used for tagging your content automatically, and for providing a solid starting point for your own tagging. And of course, you can create additional tags as needed.
Here is a quick overview of the most important terms and concepts while working with tags.
- Custom Tag: A tag which has been created by the user.
- Manual Tag: A tag which has been manually assigned to a file.
- Auto-Tag: A tag which has been assigned automatically.
- Group Tag: A type of tag that can act as a container for other tags, but not be assigned on its own.
- Hidden Tag: A hidden tag works like any other tag, but will not be displayed in the search results.
- UCS Category: A tag which also defines an UCS category.
NB: the tagging feature is only available for Libraries, not in Explore mode.
How Auto-Tagging Works
Automatic tagging is using the information available in the filename to assign tags. For example, a file called “shotgun_reloading.wav” might suggest topically related tags such as “Gun Handling” and “Shotgun”.
Also, the tagging system tries to determine if a given sample is a foley/sfx sound, an instrument or something else. After all, “kick” can refer to a drum kick (instrument), or someone practicing martial arts (foley), or perhaps playing football (again, foley). So the system has this concept of different “domains”, and tries to figure out which one any given sound belongs to.
Additionally, the built-in tags contain rich descriptions, and most of the tags define several variations of their keyword. For example, “Guitar” alone comes with more than 50 variations/synonyms.
If you do not feel that auto-tags are beneficial, they can be disabled from the Tag Options.
Assigning Tags
You can manually assign tags to your files by:
- Dragging files onto the Tag Tree. It’s intuitive to use - just don’t drag your sounds onto a group tag: such tags are not assignable.
- Selecting files and then bringing up the Tag Assigner. This is the most efficient option, especially when you are familiar with the keyboard shortcuts.
Creating Tags
There are two different approaches to creating new tags:
- Using the Tag Assigner. When the Tag Assigner dialog is open, you can type a name in the text input. If the name isn’t already assigned to a tag, you can choose to create (and assign) the tag in a single operation.
- Using the “Create Tag” dialog. Click the “plus” icon in the Tag Panel to launch the Create Tag dialog.
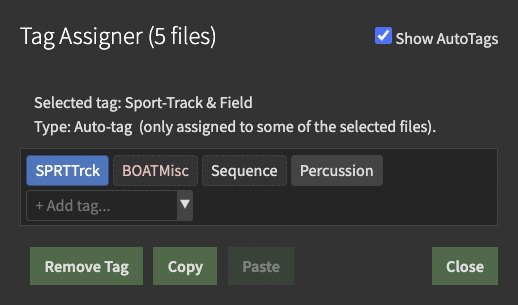
Using The Tag Assigner
Bring up the Tag Assigner to assign tags to files, remove assignments from your files, and to copy/paste tags.
The dialog can be launched in the following ways:
- By selecting one or more files in the Search Results, and then hitting the keyboard shortcut Ctrl/Cmd+T.
- By right-clicking in the search results to bring up the context-menu, and then selecting “Assign Tags…”.
- By clicking the little “pencil” icon inside the tag column. NB: this will restrict the Tag Assigner to that file only.
When using the Tag Assigner, you might see a list of tags. These are all the tags assigned to the selected files. And as you might notice, there are subtle differences in how these tags are rendered:
- A dotted outline tells us that the tag is not assigned to every selected file.
- A dimmed tag is an auto-tag. If not dimmed, the tag has been manually assigned.
- A light pink tag is a UCS category (with the option to highlight such categories turned on)
Copying And Pasting
In the Tag Assigner, you can select tags and choose to copy them. This will put the tags on a clipboard, used exclusively by the Tag Assigner.
Once that clipboard has some content (tags), the “Paste” button will also become functional. And, as you might expect, pressing the button will cause the tags on the clipboard to be assigned to the selected files.
If you copy and then paste an auto-tag, it will become a manual tag. If you remove an auto-tag assignment, the tag will not re-appear for that particular file if you should choose to refresh the auto-tags.
Tag Tree (Panel)
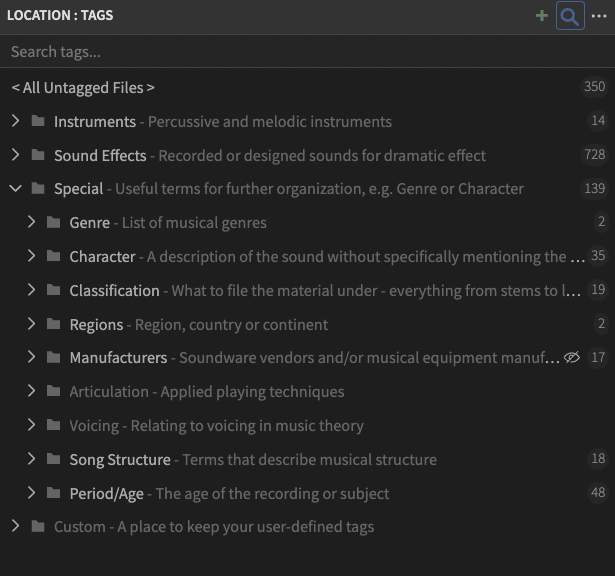
This panel provides a hierarchical overview of all the available tags. For example, “Guitar” is found under “Plucked String”, which in turn is found under “Instruments”.
Conceptually, the tag tree works much like the folder tree: when selecting a tag, its children are implicitly matched as well. And similarly, on the right-hand side, a small number specifies how many files are assigned to each tag.
But there is one major difference: while the folder tree doesn’t allow you to select multiple folders, the tag tree does: simply use the Ctrl/Cmd modifier while selecting tags.
When multiple tags are selected, the filter will either search for files containing all selected tags (Narrow mode), or files which has at least one of the selected tag (Wide mode). This can be controlled from the Tag Filter Options.
It’s also worth noting that, in the Tag Tree, all top-level tags (Instruments, Sound Effects, and so on) are in fact group tags. These tags are easily distinguished by their symbol, which looks like a folder.
Searching the tree
The tag tree itself can be searched/filtered by clicking the magnifying glass in the panel header, or pressing Ctrl/Cmd+S while the panel is focused. When searching for matches, synonyms are searched as well (this might not be immediately obvious, as the alias itself is not shown).
Please note these special search terms:
is:custom: limit tree to custom tagsis:ucs: limit tree to UCS categories
You can combine the special search terms with regular search terms. In other words, entering is:custom foo will search for custom tags which contain “foo”.
Create/Edit Tags
The following dialog will appear when you are creating a new tag, or when editing an existing tag.
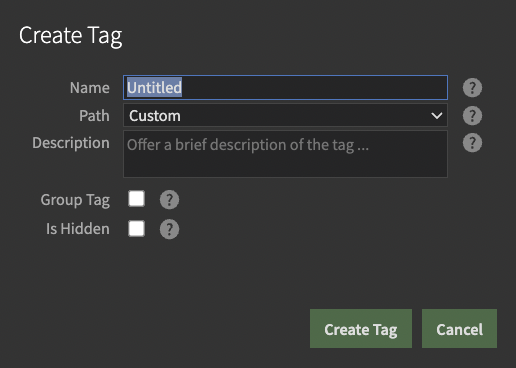
The dialog allows you to specify the properties of the tag.
- Name: What name to assign to the tag. Note: used by auto-tagging.
- Path: Where to store the tag within the tag hierarchy.
- Description: Shown as tooltip, and in the tag tree.
- Group Tag: Decide whether the tag is a group tag.
- Is Hidden: Decide whether the tag is hidden
Worth knowing about hidden tags
- A hidden tag works like any other tag, but is hidden in the search results.
- All child tags of a hidden tag will become hidden too.
- The only tag which is hidden by default is
Manufacturers.
Tag Options
The tag options is found in the upper right corner of the tag panel:
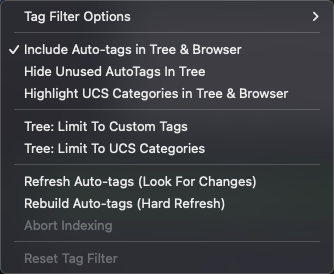
Tag Filter Options
These options apply when multiple tags are selected
- Narrow Mode: When active, search for files containing all selected tags
- Wide Mode: When active, search for files which has at least one of the selected tag.
Other options
- Include Auto-tags In Tree & Browser: When enabled, auto-tags are displayed in the browser results (tag column), as well as in the tag tree.
- Hide Unused Auto-tags In Tree: When enabled, branches in the tag tree with zero associated files are hidden.
- Highlight UCS Categories: When enabled, UCS-tagged content is highlighted in the browser, tag tree & assigner, and the UCS-specific name shown.
- Tree: Limit To Custom Tags: Click this to restrict the tag tree to custom tags
- Tree: Limit To UCS Categories: Click this to restrict the tag tree to UCS tags/categories
- Refresh Auto-tags: Click to look for files that have not been auto-tagged
- Reset Tag Filter: Click to remove all tags from the current filter criteria.
Tag Column (Search Results)
In the Search Results, look for the “Tags” column. It will show tags that have been assigned to each file (if the column isn’t visible, right-click the header to bring up the column options).

Tags column, filtering results by the ‘Rustling’ tag
- Click a tag to add it to the current filter
- Click the “pencil symbol on the right side to bring up the Tag Assigner dialog
UCS Categories
UCS stands for Universal Category System, and is an initiative started by a group of sound designers. UCS has a simple but powerful idea at it’s core: establish a system of categories that is flexible enough to satisfy the needs of professional sound designers, and ensure that these categories are available in any software.
At the most basic level, UCS is nothing more than a naming convention. And this is actually the genius of UCS: since the metadata is simply part of the filename, you will be able to browse your samples using any software.
Starting with Sononym 1.6, UCS is “officially” supported, and UCS prefixes fully integrated into our tagging system. For example, any file starting with “WEAPWhip_” will be auto-tagged with the “Sound Effects > Weapons > Weapon-Whip”.
It’s worth noting that UCS was primarily intended for sound-effects, and specifies only a few instrument categories. For this reason, we decided to come up with a solution that ensures full support for UCS, while integrating it into an even larger system. In other words, our tagging system is a superset of UCS.
You can read more about UCS here.